Orange Julius Musical Recipe

This is an activity that I have done quite a few times with general music classes.  It would also be fun for a group piano lesson.  Students name notes to decode the Orange Julius Recipe.  After they have it figured out, we simply dump the ingredients into a blender, mix ’em up, and enjoy.  I sometimes review various tempi when turning the blender from lower to higher speeds.  Students love this activity, and I have to admit, I do, too!

Orange Julius

Rhythm Cards in 3 Quarter Time

I have had a couple of requests now to do some rhythm cards in 3 quarter time.  I don’t really feel like folding my laundry, so I thought this was a great time to do them. 🙂  Most of the cards only use quarter, half, and dotted half notes, but I threw in a few with 8th notes as well. 

These will work great for one of Cecilly’s new games.  She gives her students several cards with both 3 and 4 beats to a measure.  (Click here for the 4-beat rhythm cards.)  The students seperate them and make a line of music in each time signature.  They can them clap the lines they have created.  It’s a great way to introduce time signatures!

Rhythm Cards in 3/4 Time

If you just want to print out what you need for Cecilly’s Game, then this may be the file for you.

Cecilly’s Rhythm TIme Match-Up Race

Basketball – My Way

This is one of my most popular activities with my piano students – especially my elementary aged boys. 

First they pick a card.  Today, we were doing pentascales, so we used the Alphabet Flash Cards

a1

 After a card is drawn, the student runs over to the piano, and playes the pentascale.  We always chant “tonic, whole, whole, half, whole” during this process. 

a2

If the student is successful, I toss them the basketball, and they get to take a shot in my $2 thrift store basketball hoop.  Then, they run across the room, draw another card, and do it all over again.

a3

This game could be modified many ways.  Students could draw note flashcards, play full scales, or even something as simple as identifying the letter names of the keys.  Any way you play it, it is loads of fun!

Halloween Games

There has been some great discussion on the Yahoo Piano Teachers list about games for Halloween.  Well, thinking up games is much more fun than completing the homework for the class I need to renew my teaching certificate, so here you are! 

The first game is Trick or Treat.  Print off the Pumpkin Rhythm Cards, and place in a Halloween candy bucket.  If the student picks a rhythm, it is a “trick” and they must clap it correctly.  If they draw out a pumpkin that is says “treat” they get to pick a treat from the candy stash.  If you want to, you can print the reverse side on the back of the pumpkin cards, making for games that are a bit more commercial-looking.  That way, when you cut them out there will be an image on the front and back of each card.  There is also a blank pumpkin page so you can customize the game.

Pumpkin Rhythm Cards

Pumpkin Cards – Blank

Pumpkin Cards – Reverse Side

The next game is Candy Corn Note Match. Cut apart all of the sections, and have the students match up the note on the staff, note on the keyboard, and letter name. This can be done individually or in groups, and can be competitive or not in nature. Once again, there is a blank Candy Corn page if you’d like to make your own game. I think it would be great for terms – the abbreviation, Italian word, and definition.

Candy Corn Note Match

 Candy Corn Blanks

Now, I’m going to finish writing about the Flores Consent order and Lau vs. Nichols. Really. No more procrastinating…at least for today! 😉

Rhythm Blocks

I have been wanting to make these for years, ever since I read about them in the book “A Galaxy of Games for the Music Class.” (A WONDERFUL resource, by the way!) They are great for showing the relationships between note values, rhythmic dictation, and are just a lot of fun in general. Here are the steps in making these blocks.


First, I bought 7 1/2 feet of 3/4 inch square pine. It was cut to the following lenghts:
8th note: 1 inch (cut 4)
Quarter note: 2″ (cut eight)
Dotted Quarter note: 3″ (cut 4)
Half Note: 4″ (cut 4)
Dotted Half Note: 6 inches (cut 4)
Whole Note: 8 inches (cut 2)

Next, I painted them. You wouldn’t need to do this, but I like the bright colors, and wanted easy identification of the different lengths of blocks.

Using a black sharpie marker, I drew notes and rests on each of the blocks. On the quarter note blocks, I drew a quarter note on 2 sides, a quarter rest on 1 side, and 2 eighth notes on the remaining side. The notes don’t show up well in the picture, but they do in real life.

Here are a few activities that can be done with these: (you may want 2 or more sets for group activities)

The teacher chants or plays a rhythmic pattern, and the student notates it with their blocks. This can also be done as a competition between 2 students or 2 teams.

The teacher gives a certain number of beats, such as 8. A student notates with the blocks the exact number of beats the teacher has called.

The teacher gives the student a set of parameters, such as 3 measures in 4/4 time. Student builds the set number of measures. This is fun for a group of students as well.

Another added bonus of these blocks – they are wonderful for entertaining little boys while their mommy updates her blog!

Fun Game Ideas

Megan, a piano pedagogy master’s student at Wichita State University, shared some fantastic games. I am excited to try these with my students.

Review Cube:

I made a giant dice by wrapping a styrofoam cube in
paper. For each class I teach, I make 6 cards with the concepts we
worked on in that class or older concepts from past classes. The
cards are held on to the dice with large photo corners (but Velcro
would work too). In the last 10 minutes of class students take turns
rolling the dice and we review the concept that is rolled. Sometimes
I put a different key on each side and students have to play the
pentascale.

Pentascale Spoons:

I was trying to think of a way to teach my class of 8 and 9
year old students how to be more aware of the notes they play in their
pentascales, rather than just playing the 5 notes that sound right. I
found your pentascale flashcards and started brainstorming games. We
ended playing a pentascale version of the card game “Spoons“. I made
a card with each letter name on it and instead of collecting 4 of the
same cards like in the real game, we had to collect all the letters of
a pentascale in any key. Your pentascale flash cards were spread out on the
table to help them know what to look for. When a student won and had
all 5 notes to a pentascale we went to the piano and played it. It
kept all the students thinking about which notes made up the scales
and we had so much fun!

Memory:

I made keyboard flashcards and staff flashcards. We lay the
cards out on the table and look for pairs of the same note made up of
one keyboard and one staff.

For this one, you can use the note flashcards, and the keyboard cards below.

Keyboard Note Cards

“Baby, Take a Bow!” Part 2

(To read Part 1, click here)

Now, for the second part of our exciting “Baby Take a Bow” group lesson…

After practicing our bad vs. good bows, it was time to practice our pieces for the upcoming performance at the local mall. I explained to the students that there are always distractions while we play. Babies cry, people sneeze and cough, someone might forget to turn off their cell phone, and on and on. These distractions would be even more prevalent at the mall where we were performing.

We discussed how important it is to stay focused on the music we were playing. No matter what happenens, we must not react to it. That can sometimes be a hard thing, so we took the opportunity to practice. I had a student come to the piano. Another student was assigned as the “distractor.” Their job was to do anything they could to get the performer to loose their concentration. The only rule was they could not invade the performers personal space or touch them in any way.

DistractionsOh my, did the kids have fun with that one! They slammed doors, dropped books, jumped up and down, stared at the performer, and anything else they could come up with. My teenage group was a bit more hesitant to make such annoying distractions, so the whole group played “distractors” during each performance. They soon warmed up, and were jangling keys, playing hand-clapping games, and were much more distracting that my elementary group.

Every single student performed admirably with all of the distractions. No one lost their concentration, even with all the revelry going on around them. After we had all taken our turns, I praised them for their focus when performing. I told them that it would never (I hope!) be that bad in an actual performance. There would always be distractions, though, and now they knew that they were capable of a polished performance no matter what was going on around them.

The lesson was a great success, and when the annoying security alarm kept going off at the mall, my students kept going with their focused, polished performances!

“Baby, Take a Bow!” Part 1

Before our first performance this past October, we had a group lesson to rehearse our pieces, and practice playing for an audience. Sounds like it could be a bit boring, doesn’t it? Not in this performance class – it was a riot, and both the students and I had a great time.

candyPreparation for this is pretty minimal. All I did was go to the grocery store, and buy lots and lots of candy. Not the little Halloween-type bars, but the normal-sized good ones. I only bought candy that was on sale, and happened to hit it when there was a lot of candy for 25 to 33 cents each. Before the class, I put all the goodies in a big basket with a lid on the piano. Times like this make me glad that I charge a registration/materials fee at the beginning of each year. 🙂

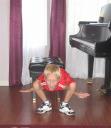
The theme of the class was “Baby, Take a Bow!” There is nothing I like more than a professional, well-executed bow at the beginning and end of a performance, and I wanted to drill that into everyone’s head. So, to start the class, I stood up from my chair, rambled up to the piano bench, didn’t look once at the audience, plopped myself down on the bench, and gracelessly stuck my hands on the keyboard. Without playing anything, I asked the students to tell me how my performance was going to sound. Not surprisingly, there was not a single positive comment! I told the students they were horribly unfair to me – they judged my playing before they even heard a note!

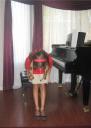
Then, I did it again. This time, I “walked like a princess” to the piano, looked at the audience, bowed, sat nicely down on the bench, and made sure I was at a comfortable distance from the piano. I collected myself for a moment, then gracefully placed my hands on the keyboard, ready to play. When I repeated the question of how good of a pianist I was, responses were all glowingly positive. I told the students people judge the kind of pianist you are from the moment you stand up, before a single note is played.

Silly BowNext, it was time for our first game, known as “How Bad Can You Bow?” I had each student make a grave bowing error, such as bowing with feet apart, looking at the audience while they bowed, not making eye-contact with the audience, the bow-while-still-walking-to the-bench, and anything else the students and I could come up with. Everyone took a turn executing their “bad bows.” We were howling with laughter with some of them. We had a very informal vote, involving cheering and applause for the best “worst bow”. I declared us all winners, and had the students gather around the basket of candy. Their eyes almost popped out of their heads when they saw all that candy! Each student picked one candy bar.

Good BowNext, we played “How Good Can You Bow?” First, we practiced how to bow as a group. Then, each student walked elegantly to the piano, bowed, and sat down, and played one note or chord. The audience clapped, and the student bowed and walked elegantly back to their chair. If their bow needed attention, I had them fix it. Most were fine, though.  We clapped thunderously for the great bows, I declared us all winners, and each child picked another candy bar.  We listened to some classical music from the composer of the month while we feasted on our junk food.

This was a really good activity for the students, because they saw the difference between a polished pianist walking on stage as opposed to “just some kid playing a song in a piano recital” type of thing. They also got to see why I insist on properly executed bows. People often judge books by their covers, and pianists by their walk to the piano bench.

More about this amazingly fun group lesson to come soon!

Musical Alphabet Blocks

Have you seen Natalie’s great post about making scale blocks? Well, we must be thinking along a similar wavelength. I love my scale blocks, but wanted to have more to use in group classes. Unfortunately, the budget wouldn’t allow it. Then I thought back to elementary school and those cool 3-D shapes we used to cut out and glue together. A quick internet search, a bit of finagling on the computer, and here is the result – paper scale blocks! Easy to assemble, and inexpensive enough that the students can even take them home. Use cardstock for best results. Use them for learning the musical alphabet, steps, skips, intervals, scales, chords, and anything else you can think of!

Musical Alphabet Blocks

Musical Alphabet Blocks


Lets Have a Spelling Bee!

This is another of Sharon’s great ideas. I used Natalie’s list of words that can be spelled with the musical alphabet at musicmattersblog.com to make these cards. One side is the word spelled on the staff, and the other side is the word written out. All words are spelled in both clefs. The lines of the staff don’t look perfect on my computer screen, but they print out beautifully.

Line students line up in 2 teams and have students try to say the word before the other team. Another variation is to show the word side of the card and have students write the word on staff paper or a white board. They could work individually, or race against each other. This would be a great game for a group lesson.  To use in an individual lesson, have students play the words that are spelled on the keyboard.  Maybe they could use a couple of their favorite words to begin their own composition.

Post any other ideas of how to use the cards in the comments below!

Word Flashcards

Word Flashcards